When growing fruit and vegetables in small spaces, your main task is to maximise your harvest through close plantings of correct varieties, ideal soil preparation (to enable closer planting), and use of all available space, horizontal and vertical. That’s the crux of it, and it’s on these three points that I want to spend the bulk of this guide.
Jump to: Soil | Light | Pests & Other Problems | Vegetable, Fruit & Herb Guides
Understanding the basics of small-space growing
Most urban spaces offer an opportunity to get creative about gardening, and it’s that approach,of being open to new ideas and technologies, that I try to bring to my own growing efforts. No space is unsuitable: walls, shady spots, overhangs for baskets…there is always a suitable plant.
If you do have a lawn consider replacing it with raised beds. Don’t worry about destroying the visual appeal. You can draw inspiration from the French potager tradition, potager here referring to ornamental edible gardens.

The stately leaves of amaranth, the variegated colours of swiss chard, the purple edible flowers of chives…the potential for eye-catching matches is endless (see the picture of French palace Villandry above).
A frame with climbing beans, for example, can make a much more intriguing centrepiece than a few square metres of grass. Additionally, you can companion plant non-edibles like marigolds, trailing lobelia, or geraniums, all of which add colour. Many flowers also have the benefit of deterring pests
If you do decide to dig up your lawn, there’s a guide to constructing raised beds below. If you’re time-stretched (or just lazy like I am), there are raised bed kits that you can buy or even plastic sets like Link-A-Board.
Equally, if your garden is shady, there’s no need for concern. You will just have to tend towards plants that can do well without lots of direct light, like beans and lettuces. Acid cherry trees can also be planted in shade.
Obviously, you will find your own approach, built on experience, taste and the books and advice you naturally gravitate towards. This is just my take on the subject, and it’s meant mainly for those starting out. Please do get in touch (through the contact page) to let me know what you think. Anyway, onto the most important aspect of any type of gardening…
Soil for growing fruit and vegetables in small spaces

If I had to boil down the art of small-space gardening to three factors they would be: (1) preparing plant-specific soil to allow for closer planting, after which regular feed is applied, (2) correct variety selection, and (3) appropriate use of space. Here, we’ll have a look at soil generally. Advice about how to modify soil for particular plants is given in the “vegetables section” below.
The diagram above illustrates the wide variety of soil types that can occur. All are a mix of sand, clay and silt. Soil itself can be defined as a mix of minerals, organic matter (rotted plants in some form or another), and microorganisms – bacteria and fungi.
Because we’re going to be amending our soil or growing in pots, we don’t need to worry too much about identifying which particular type our garden soil is. That said, it’s worth familiarising yourself with the terms that are commonly used in relation to commercially available growing media. When I started out, navigating my way through the myriad of composts and mixes was a nightmare…not to mention very frustrating.
One word you will hear a lot is “soilless”. A soilless mix is simply one that doesn’t contain soil that resembles the type you would find in your garden. There are no minerals and, usually, an absence of microorganisms. “Compost” (when the term is used correctly) refers to decayed plant matter. As you will say later on, it’s really worth getting your own heap going. Finally, “topsoil” refers to a well-balanced soil mix (loam in the table above), usually with some compost added.
Choosing Your Compost

Store-bought multi-purpose compost is usually a mix of rotted organic matter (compost proper) and other materials like coconut fibre or peat (which is itself decomposed plant matter). It’s always worth trying to find the highest-quality compost that you can, making use of the internet if you need to. Multi-purpose compost is usually fine for containers.
I’m writing in the UK so I can’t comment on suppliers abroad, but over here John Innes no.3 is largely regarded as being one of the best and most nutrient-rich. Composted manure, which is readily available, can also be added (substitute part or all of the compost for the manure). Lots of root vegetables, like potatoes, absolutely love it.
In the image below, you can see what happens at an industrial composting site. Huge quantities of organic matter are piled up and left to rot down, being turned regularly to keep them aerated.

Adding lime to to soil, with the exception of potatoes and ericacious plants, can also be beneficial as vegetable plants tend to prefer more alkaline soils. Tend is the key word here as there are many exceptions! Always do a little research on your chosen plant. 1 tablespoon to 10 litres of soil will usually suffice and you may only need to add it to your raised beds every few years or so. Click here for a good RHS (Royal Horticultural Society) liming resource.
Finally, consider adding some perlite. It will help with drainage. Horticultural sand can also be added to certain crops like carrots, whose roots develop well in less compacted soil.
Feeding & Fertilizers
Regular feeding can be the difference between small, straggly crops and big, healthy ones.
Feeding is all the more important because your soil will likely be nutrient-parched due to closer plantings. A plant needs nitrogen (N), phosphorous (P) and potassium (potash) (K), alongside a host of trace minerals in much smaller quantities.
I prefer to use plant liquid fertilisers on a weekly or bi-weekly basis and, as long as your soil preparation is right, this is all you need. Go with a good brand to ensure that trace-minerals are included. Compost usually runs out of nutrients after about six weeks once your plants are in full growth, which is when you’ll need to start your feeding regimen.
When preparing mixed beds, my approach is to mix in an organic slow release fertiliser (blood, bone and fishmeal is my choice) once before planting and then again after eight weeks or so.
Keeping Soil in Pots Enriched
As mentioned, it’s vital to feed at a regular intervals. For perennial herbs, shrubs and fruit trees, you can remove an inch or two of soil from the top of the pot and add some fresh compost at the beginning of spring or autumn. Re-pot them every three years or so. You can also add a slow-release fertilizer (which can last for up to 6 months) in addition to, or instead of, regular feeding.
Looking After Your Plot
If you’re growing in the ground, or in raised beds, you’ll need to treat the soil at the end of the growing season. Forking a few inches or manure or compost (home-made or bought) into the top of the soil, along with a general slow-release fertilizer, is usually all that’s needed.
Compost Bins
There’s something satisfying about making your own compost. It might just be me, but taking the dinner leftovers out onto the balcony and popping them in the compost bin, in the knowledge that I will be using organic, nutrient-rich compost to grow my own crops in a few months, I just feel more self-sufficient and more connected to my food and the natural processes underlying it.

If you’re wondering about the definition of the word compost, and how it relates to words like “soil”, “potting mixes”, “hummus”, and “multi-purpose”. I’ve written my personal take on the subject on my indoor growing guide. In the context of this article, I’m simply taking it to mean pure rotted organic matter.
It’s unlikely that you’ll be able to have a heap or tumbler on a balcony or patio, so a smaller barrel, from which you can draw compost out at the bottom, is the best way to go. Around 200 litres is usually a good mark. It’s not going to fulfil all of your compost needs, but will provide a nice addition.
So how long will it all take? Whilst there are a range of factors, and decomposition will obviously be slower through winter, you’re generally looking at between 2 – 8 months.
Not specific, I know, but it’s hard to give an estimate. The other concern is in regards to temperature. Compost piles need to heat up as part of the decomposition process, which is achieved by the activity of the various micro-organisms. Generally speaking, the lower the temperature, the longer it takes to get compost. As smaller piles don’t heat up to the same temperature, you’ll be on the slower end of the scale. You will also struggle to achieve the right heat at all in a pile below 4 feet.
Drainage is vital as you want your waste material to be moist but not soggy (a few drops when squeezed). Most compost bins are designed to rest on the open ground and so drainage isn’t a problem but if you’re planning on having it on a patio or balcony, you need to check for adequate support and water collection at the bottom.
The other thing to consider is animals! Rats thrive in urban environments and you don’t want them sniffing out your scraps. Make sure any bin is rodent-proof.
What You Can Put Into Compost…
It’s important that you combine the right mix of waste materials to ensure a good chemical balance.
Compost heaps need good amounts of both nitrogen, which will come from edible waste like greens, and carbon, which will come from paper and leaves, to rot down properly. Use the rule of 1/3 nitrogen-containing materials and 2/3 carbon materials as a balance to try and maintain.
- Any plant foliage. Avoid plants with disease or blight (burn these).
- Untreated lawn cuttings (i.e. no weed-killer).
- Roots and stems. Again avoid those affected with disease and bash them up a little bit.
- All non-meat and non-dairy kitchen waste.
- Egg shells.
- Shredded paper and egg cartons. Avoid glossy packaging as plastic is usually incorporated in some way.
- Avoid: faeces of any kind.
- Avoid: meat and dairy.
Vermicomposting
For those with the inclination, vermicomposting (or “worm composting”) can provide an alternative, or addition to, typical composting. It’s generally done in a smaller bin and you have to be a little pickier in choosing what you add, but it results in very nutrient rich compost. For those growing in pots, vermicompost can be invaluable in providing both microorganisms and nutrients, especially when repurposing old mixes.
You’ll need “red wigglers”, which are readily available online. As far as containers are concerned, I’m particularly fond of the Worm Factory, which is well made, adaptable and inexpensive. Also remember that castings (worm poo) are higher in nitrogen so need to be used more sparingly when preparing your pots/beds.
If you’re interested in this approach, Henry Own runs a great resource called Worm Composting HQ, where you can learn the process from start to finish.
Light
In urban settings, evaluating light can be a tad more difficult than usual. Because of the presence of adjacent buildings, shade is usually more prevalent. That said, my experience is that most small gardens and balconies get enough direct light to grow most types of vegetables. If you are in a particularly shady spot, then keep to root vegetables and leafy greens.
6-8 hours of direct light seems to be the most commonly-cited minimum requirement for vegetables, and I’ve no reason to argue with that figure. 4 for leafy greens like lettuce and spinach and 8 or more for fruiting plants. In the northern hemisphere the sun rises in the east and sets in the west, so east-facing gardens and windows get the morning sun, west-facing gardens and windows the evening sun and south-facing gardens and windows have the sun all day.
North-facing windows usually get a little sun in early morning and late evening, so can still be suitable for growing low-light plants through summer. If plant growth is slower in light-deprived areas you might want to tone down the feeding schedule.
Pots, Containers & Raised Beds
There are various specialist pots that are particularly useful to small-space gardeners. Strawberry barrels, for example, have lots of interior room for soil and little open pockets along the exterior. Such a design is well suited for compact plants that have hanging fruit.
Similarly, can be used for a vertical set-up and are suitable for a variety of plants. They’re also adaptable and fairly inexpensive. It’s always worth covering the bottom of the pot with a thin layer of pebbles, rocks or broken terracotta. Soil can quite easily compact, thus blocking off the drainage holes and making it easier for plants to drown in the build-up of water.

For root vegetables like potatoes, you will need to provide more depth. One of the cheaper options is potato grow bags, which you can get cheaply from Amazon. I’ve had a lot of success with these and highly recommend them.
Hanging baskets also deserve a mention. They’re good for short-growing (most hanging baskets won’t provide a great deal of depth) plants and trailing ones like tomatoes.
If you’re willing to spend a little more money, there are many products on the market that take advantage of space. “Patiogro”, designed by Peter Wolfenden, is a three tier pyramid-shaped shelving system in which various sizes of pots can be placed.
The Garden Tower Project sells a (somewhat pricey but high-quality) patent-pending grow tower that also has a central compost bin and wormery, so works almost like a closed eco-system. Also consider Burgon and Ball’s Verti-Plant range, a cheaper option for wall growing.
Finally there’s the option of compost-ready grow bags. If you’re planting onto a patch of soil, you can try cutting the bottom of the grow bag out so that the plant can root into the soil underneath. My grandfather, whose tomatoes are particularly prolific, absolutely swears by this method. Of course, if you’re planting on stone or concrete, this won’t work.
Generally, a normal grow bag, particularly a high-quality one, will be suitable for smaller plants like lettuces. Tomatoes and chillies, on the other hand, tend to need a little more space for their root system. If your planning on growing these, consider cutting out the bottom of a plastic container, popping it in the grow bag, and filling it to the surface with compost. Final point: don’t forget about cutting some drainage holes in the bottom!
I now get a lot of my pots online. You can plan your future garden from the comfort of your desk, then hop onto Amazon and have all the seeds, materials and even plants sent by post. As your space develops you can just continue this theme, your new ideas being sent through the mail.
Make sure you check that terracotta pots are frost-proof. Plastic pots retain more water, so are good for plants that like damp conditions, whereas terracotta pots allow moisture to evaporate through their porous walls, so can be useful for plants that prefer dryer conditions, like rosemary.
How to Build a Raised Bed
- Mark out the area with pegs and line/string.
- You can make sure that you have flush 90-degree angles by using the “3, 4, 5 square” method. (See the video below.)
- Turf up the lawn to a depth of two inches but don’t discard it.
- Fix your wooden edging in. Makes sure they are varnished so they don’t rot when they come into contact with the soil.
- Remove any top soil until you get to the harder firmament below.
- Loosen this up and mix with a little sand or grit for drainage.
- Place the turf grass-side down and shovel the topsoil you removed on top.
- Add some compost or a manure/compost on top, approx 2/3 cm below the top of the edging.
- Leave for as long as you can (preferably a few months to settle, which is good but not vital).
- This depth and good quality compost/decomposed grass will mean that you can plant closely.
- Don’t tread on raised beds as it compacts the soil, pushing out air. Use a wooden plank if you need to stand on top of the bed.
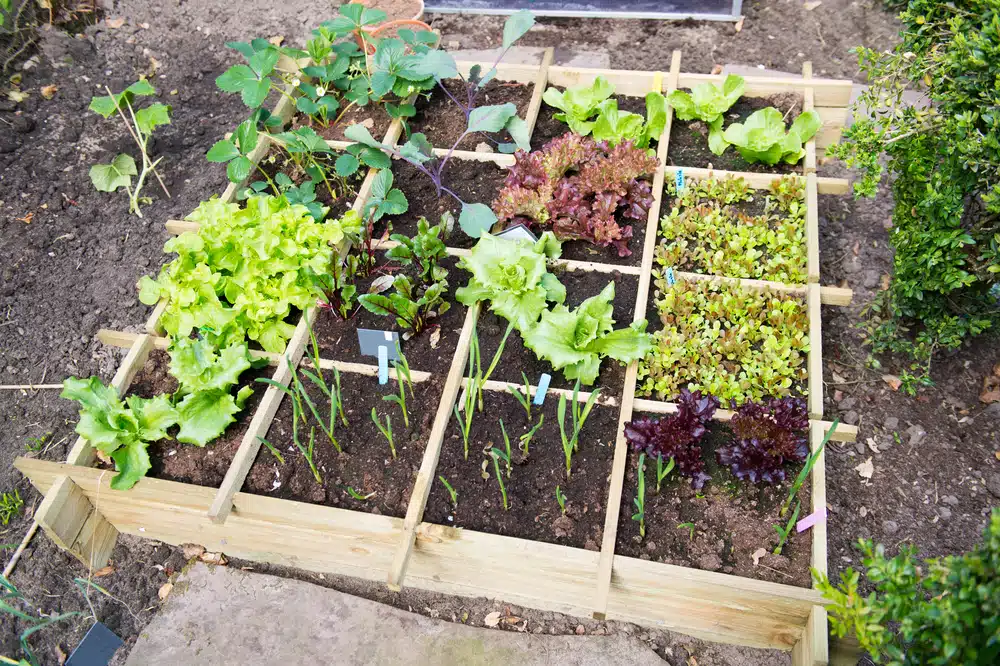
Planning Your Garden: Succession Planting
The key to space maximisation is succession planting. Rather than planting everything at once, the idea is to begin most of your crops, at certain weekly or monthly intervals, in plug trays or small pots.
You then plant these out once they’ve reached a certain stage of growth. This way, after the initial growing period, you have just enough food for the current week (if your planting out weekly), with another batch that will be ready for harvest next week, and so on.
This might seem like a lot of plants but in reality it’s not. Say, for example, that you want three little gem lettuces every week, and that they take around 12 weeks to mature, that means you will only have 36 plants in your plug tray at any one time. Not a massive amount by any standard!
In terms of saving space, you can buy rectangular module trays designed to fit snugly onto a windowsill. The best option, in my opinion, is a “mini greenhouse” (see the picture). I have three on my balcony.
Hardening off
You will also need to harden off young plants, a phrase which simply means acclimating to harsher outdoor conditions, before transferring them to their new home in a garden pot or bed.
Start by taking them outside for a few hours every day, preferably leaving them in dappled shade. Increase their outdoor time and exposure to sunlight daily by a few hours. After a week they should be ready to go. If it’s cold outside, with the prospect of harsh turns of weather still lingering, consider utilizing a home-made cloche.
Watering
To check if your plants need watering, use the traditional “finger check” method. If the top inch is dry then it needs a drink. Give it a good soak rather than a sprinkling. Doing so means the water will trickle all the way to the bottom of the patch or pot.
You may also want to consider saving rainwater. You can get slim “water butts” (the common phrase used to refer to rainwater storage containers) that are particularly well-suited to small spaces and balconies. These come with a small tube that attaches to the drainpipe to collect the run-off.
Also, there are a number of cool gizmos that are designed to help with watering if you need to go away. They all essentially work by suspending a store of water above the pot or growing area with a flow-control mechanism at the opening.
Pests and Other Problems
Fungus: The most common types of fungus are blight and powdery mildew (pictured below), indicated by a grey-white fuzz on any part of the plant. A folk remedy for powdery-mildew is a mix of milk and water (at a 1:10 ratio) sprayed onto the affected parts. Blight is a little trickier and is especially common on tomatoes. Cut off affected parts as soon as they appear.

Slugs: You can buy slug pellets but there’s something intrinsically off-putting about having poisonous chemicals in your garden. If you really want to travel down this route, buy organic products.
Beer traps are a more environmentally-friendly option, as are crushed eggshells, or gravel, placed in a circle around the base of the plant. The idea is that both slugs and caterpillars have soft bellies and won’t travel over the spiky barrier. The final option is to check the leaves just before bedtime with a torch and pick them off. Time-consuming but effective!
Aphids: Aphids feed on plant juices by inserting their needle-like suckers into leaves and stems. This not only weakens the plant’s ability to photosynthesise, but can also transfer of bacteria and viruses.
They tend to prefer new growth, so look for them at the tips of plants. Indoors, such as in a greenhouse, the introduction of ladybirds (you can buy the larvae online) can be an effective solution. Otherwise, adding a teaspoon of mild soap to a spray bottle of water and spraying the leaves can be equally effective. Insecticides suitable for edible plants are available. The picture below shows a particularly bad infestation.

Whitefly: Whitefly is easily recognisable and relatively harmless. A liquid soap will work as will yellow sticky pads hung near the plant (they like the colour yellow).

Vegetable, Fruit & Herb Guides
Below is a little introductory advice about growing some of the more common vegetables, fruits and herbs. It should be enough to get you going. As hitherto mentioned, success with closer plantings rests on good soil preparation. So the important question for small-space gardeners is, “What is the ideal soil for this plant?”
I highly recommend The Vegetable & Herb Expert by Dr. D.G. Hessayon (or The Vegetable Expert Notebook as a shorter alternative). Though the author can be a tad over-definitive in his tone, it’s by far one of the best and most comprehensive edible gardening books in the world…in my humble opinion.
As mentioned, vegetables tend to prefer alkaline soils but don’t lime just for the sake of it. Before adding lime to a growing area, use a pH kit to test the area.
Beetroot
Beetroot is easy to grow and many varieties are available. I’ve had lots of success planting them closely together (about 4in. distance between plants) with some springs onions interspersed between.

Soil-preference: Nutrient-rich, alkaline soil with a few handfuls of sand added. Regular feeding after six week period or so.
Good small-space varieties: Boltardy, Chiogga, Cylindra (this variety has longer, narrower roots so will require a deeper pot but can be planted more closely, good for urban raised beds).
Common problems: Watch out for mangold fly and their leafminer babies, indicated by white tunnels across the surface of the leaf. Yellowing leaves can be an indicator of nutrient-deficiency but shouldn’t be a problem in the right soil.
Carrots
As far as carrots are concerned we want quick-maturing, golf-ball sized varieties. They’re excellent for pots and I’ve always thought that the foliage, which is slim and erect growing, perfect for closer spacing, looks wonderful in terracotta pots. They don’t like to be transplanted so sow directly into the sowing container, bringing it inside if it’s too cold out. They can do OK in a little shade by may be slower-growing.

Soil-preference: This is one plant that’s finicky about its soil. It wants it deep, fertile and loose. Use a 40:60 sand to (qood-quality) compost mix, with a little added perlite and a deep pot.
Good small-space varieties: Parsienne, Paris Market, Caracas.
Common problems: Carrot fly, indicated by reddish leaves, can be a an issue. One good preventative measure I’ve heard is to use a tall pot nearly a metre off the ground (see what I’ve done on my patio) as the insects fly quite close to the ground. Make sure the tops of the root are covered with soil during growing to prevent green top, which is not dangerous but doesn’t taste very nice.
Lettuces
I like lettuces. They’re easy to grow and good for “leaf-picking” as needed. They also tend to deal quite well with close planting. Generally speaking, there are four types of lettuces. Loose-leaf varieties do not form a tight heart and can be picked intermittently. “Salad Bowl” is a good example. Crispheads form tight hearts of crispy leaves and are also often called iceberg lettuces. COS varieties are head-lettuces with a vertical growing habit, so good for small-space gardening. Finally, there are butterheads, which are semi-open, sweet-tasting plants with waxy leaves. They will grow in most soils
Don’t take more than 30/40% of the plants growth and allow it to replenish this before picking again.
One great technique, borrowed from Dr. Hessayon’s The New Vegetable and Herb Expert, is to sow cos lettuce seed very closely, 1in. apart in 4in. rows. Harvest at 4-6 weeks, cutting the lettuce off about half an inch above the soil line and leaving it to regrow.

Soil-preference: Moisture is the the key word here. They like alkaline, nutrient-rich, moist soils. Use a good, loose compost with some lime added if the pH warrants doing so (don’t worry too much about this if it’s too much hassle). Keep well-watered in summer. Overcrowding and dry soil can cause bolting so make sure they are well-watered if planting closely together.
Good small-space varieties: Little Gem (COS), Winter Gem (COS), Tom Thumb (Butterhead), Salad Bowl (Loose Leaf) Lollo Rosso (Loose leaf).
Common problems: Because they’re tasty, pests like slugs and caterpillars love lettuces. Because they prefer damp conditions, fungi like downy mildew and grey mould feel equally at home. For mould issues like downy mildew, remove affected leaves as soon as you notice any symptoms. Slug pellets, egg shells or fine netting can deter pests that want to eat your leaves.
Potatoes
Though easy to grow, with varieties for growing through both spring (earlies) and summer (maincrop), potatoes are big plants. I very much recommend using potato grow bags. Equally, early varieties, which are slightly smaller, are better suited to small gardens. Buy certified seed potatoes and leave them to chit. Don’t use supermarket-bought ones.
Earlies are ready to harvest after the first flush of flowers has died.

Soil-preference: They’re not fussy. I mix composted manure with a cheap-multi-purpose compost.
Good small-space varieties: Any “early” variety.
Common problems: Generally pest-free although potato blight can be an issue for maincrop varieties. You can use a copper spray at the first sign of early symptoms.
Radishes
Radishes aren’t fussy about soil-type, they’re quick maturing (only five weeks in some cases), and they come in a range of small varieties. They are fairly shade-tolerant.

Soil-preference: They’ll grow in most unused corners. If you’re growing in pots add and sand to the compost (30:70).
Good small-space varieties: Cherry Belle, Scarlet Globe,
Common problems: I’ve never experienced problems with radishes. Slugs and sails can eat the leaves in which case the aforementioned advice stands.
Fruits
Save fruit growing for the hottest summer months.
Tomatoes
Tomatoes are perfect for for sunny south-facing windows during summer, or for a little greenhouse. Tomatoes are notoriously prone to blight, which can be a little more common indoors, so make sure the plant is well-ventilated and don’t splash the leaves when watering.

Soil-preference: They’re not fussy, any multi-purpose will do, but regular feeding with a tomato feed after flowering is vital.
Good small-space varieties: F1 Totem, Tommy Toe, Maskotka.
Common problems: Blight, as mentioned.
Strawberries
Strawberries are great for small-space or urban gardens as they are smaller plants. A strawberry barrel is a great addition to any growing area.

Soil Preference: 30:70 sand to compost ratio. No liming as they prefer slightly acidic soil.
Good small-space varieties: Any.
Common problems: If growing on a raised bed, cover the ground with straw to prevent fruit coming into contact with soil.
Other Fruiting Plants
“Step-over” or minarette apple trees are well worth an investment. The former’s apples grow along it’s main trunk and the latter grown horizontally with the aid of support. Peppers (actually fruit but often treated as vegetables) are also easy to grow in any soil in good light and warmth.
Herbs
If you can, just buy a herb plant. Starting from seed is a bit tricky with a lot of herbs and you’ll have to wait quite a time before you can start harvesting. Most herbs don’t like sitting in soil that’s wet so sand and terracotta are your friends in this regard! Compost, a few handful of sand and a bright spot are all that’s needed. They tend not like the cold s bring them inside towards the end of autumn until late spring. Feed every ten days or so in summer.

Rosemary
Rosemary grows along windy cliff-sides. It likes well-draining soil, so add sand. It doesn’t like to be over-watered, and (I’ve found) doesn’t do too well in a very hot environment, so get it outside in summer.
Thyme
Treat thyme as you would rosemary, with a little bit more water. I find it can also tolerate higher temperatures better.
Parsley
Parsley is a biennial, so will last for two years. It can be difficult to start from seed.
Chives
Chives are one of my favourite plants. They’re perennials, do well in shade and can be harvested several times a year. As with most cut-and-come-again plants, only take up to 30% of growth then allow it to regenerate. Cut chives about half an inch above the soil level.
Bay
Grow bay-leaf in a pot, as it may need to be brought inside during (very) cold spells of weather.
Further Reading
The New Vegetable & Herb Expert by Dr. D.G. Hessayon
The Urban Kitchen Gardener by Tom Moggach (The book is very expensive from Amazon.com and works out cheaper if you buy it from the UK site and pay for the shipping.)
Vegetable, Fruit and Herb Growing in Small Spaces by John Harrison